Several users face hurdles and unwanted glitches during Windows updates. Here are some points on how to clean the Windows update cache.
Windows Update is a critical tool for keeping your computer secure and running smoothly. It delivers new features, performance tweaks, and vital security fixes. However, sometimes updates get stuck, fail to install, or slow down your system. Often, the culprit is a cluttered or corrupted Windows Update cache—a stash of temporary files that help speed up updates. Clearing this cache can resolve many common issues. In this guide, I’ll walk you through the process step-by-step and provide additional tips to ensure your system runs smoothly.
Why Clear the Windows Update Cache?
The Windows Update cache stores temporary files in memory to avoid re-downloading them every time an update is installed. While this speeds up the process, over time, these files can pile up or become corrupted, leading to issues such as:
1. Failed Updates
The cache interferes with new updates when it gets full of invalid data and becomes damaged. The update process becomes unsuccessful due to the cache buildup which leaves systems exposed to security threats and without access to new performance features. The clearing process eliminates Windows cache storage so new updates can be downloaded without encountering any barriers.
2. Stuck Updates
Does it ever happen to encounter updates that get stuck on a particular percentage point? The system generates this issue because problematic or unfinished files exist in the cache storage. Clearing your cache eliminates the troublesome files which lets updates complete their installation process successfully.
3. Slow System Performance
System speed will decrease when the cache expands beyond manageable limits as it consumes disk space and consumes system resources. As your system collects unneeded files its performance becomes slower thus tasks like startup application launch and web navigation become slower. Cache clearing creates more available storage space as well as system resources which results in enhanced system performance.
4. Error Codes During Updates
Windows Update errors with codes 0x80070002, 0x80070003, and 0x80073712 usually stem from cache problems. The errors create annoyances that stop your computer from receiving regular updates. Clearing the cache successfully fixes these errors since it eliminates problematic files and enables a fresh Windows operation.
5. Prevents Redundant Downloads
With its time-saving purpose of file reuse the cache may produce Windows updates while downloading identical files when the cache contains outdated or corrupted content. Such behavior consumes network resources while extending the duration needed for the updates to run. The update process becomes more efficient after clearing the cache because outdated files are permanently removed.
6. Resolves Update Conflicts
The existence of outdated files in the cache creates problems by generating conflicts with fresh updates which might lead to system stability issues or installation failures. Clearing your system’s cache helps to resolve conflicts that lead to proper update installation which maintains your system stability.
7. Improves System Reliability
Removing outdated cache files lowers the possibility of update-related problems which helps ensure a safe and dependable system operation. The process of clearing the system cache prevents unpredictable system failures and software crashes that can occur during updates.
Clearing the cache gives Windows Update a fresh start without affecting your already installed updates.
Precautions Before You Begin
Before proceeding, ensure you:
- Back up your data: While clearing the cache is generally safe, it’s always good to back up important files.
- Check your internet connection: A stable connection is necessary for re-downloading updated files.
- Close all running programs: This prevents any conflicts during the process.
Step 1: Stop Windows Update Services
To safely clear the cache, you need to stop the Windows Update services temporarily. Here’s how:
- Press Windows + S, type Command Prompt, right-click it, and select Run as administrator.
- Copy and paste the following commands one by one, pressing Enter after each:
net stop bits
net stop wuauserv
net stop appidsvc
net stop cryptsvc
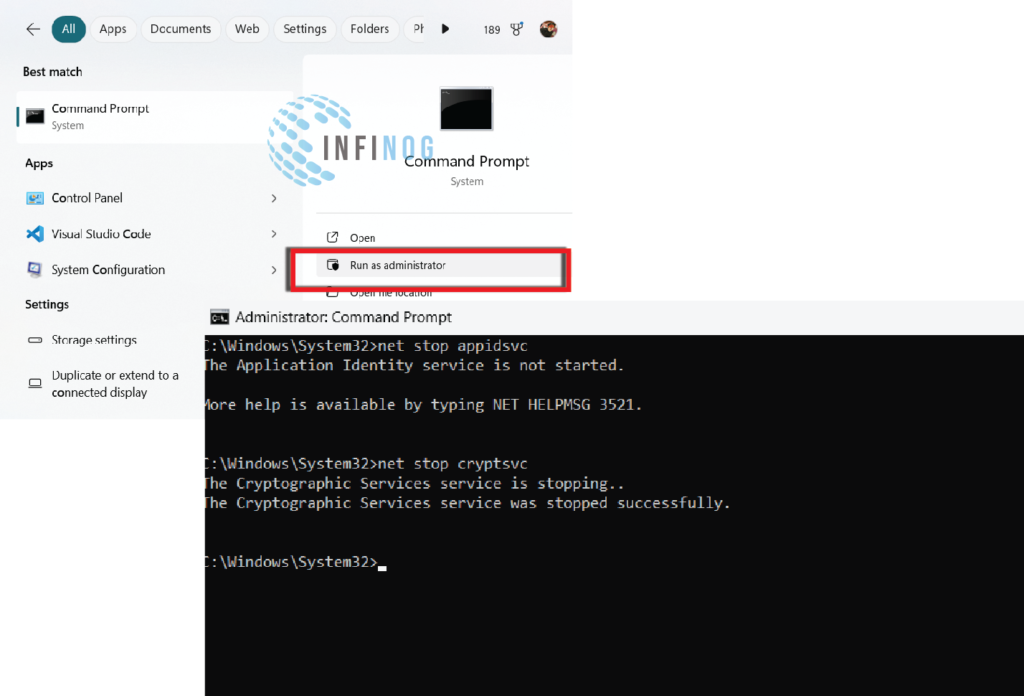
Stop Windows Update Services - These commands pause the Background Intelligent Transfer Service (BITS), Windows Update service, Application Identity service, and Cryptographic service.
Note: Don’t worry—these services will restart automatically when you reboot your PC.
Step 2: Delete the SoftwareDistribution Folder
The SoftwareDistribution folder contains the cached update files. Deleting it forces Windows to rebuild the cache from scratch.
- Open File Explorer and navigate to:
- Copy [ C:\Windows\SoftwareDistribution ]
- Select all files and folders inside (press Ctrl + A).
- Press Shift + Delete to permanently remove them.

Delete the SoftwareDistribution Folder
Step 3: Restart Windows Update Services
Let’s restart the services using two different methods;
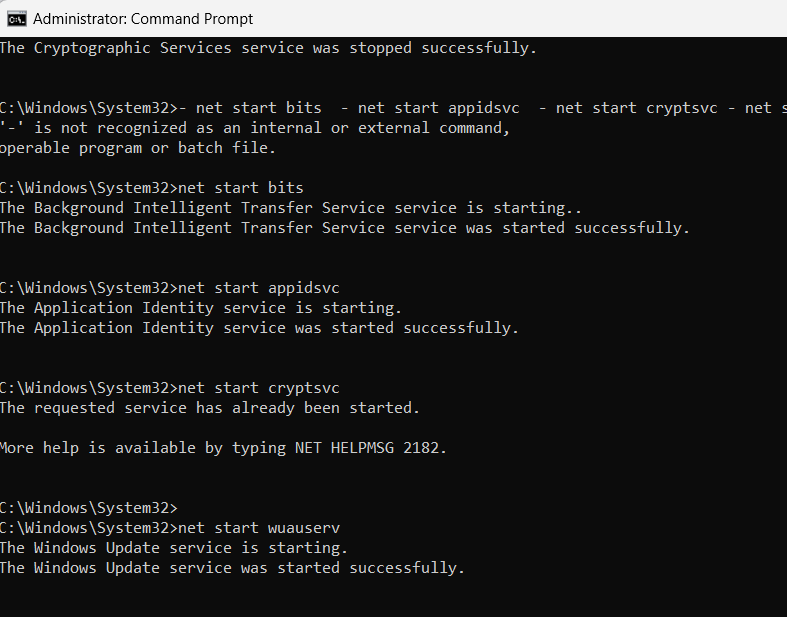
Method 1: Using Command Prompt
- Go back to your administrator CMD window >> enter all commands in your system.
- So, just type the following command in the prompt;
- net start bits
- net start appidsvc
- net start cryptsvc
- net start wuauserv
Method 2: Via Services Manager
- Users can start by pressing Windows + R then enter services.msc followed by pressing Enter.
- Users need to access Windows Update from the Services window.
- Right-click it and select Start.
Step 4: Clear the Delivery Optimization Cache (Optional)
Windows uses the Delivery Optimization feature to share update files between PCs on your network. Clearing this cache can free up additional space.
- Press Windows + I to open Settings.
- Go to System > Storage > Temporary Files.
- Check the box for Delivery Optimization Files and click Remove Files.
Step 5: Reboot Your Computer to Clean the Windows Update Cache
Close the computer down to check if your modifications are properly implemented. Users need to restart their computer before performing another update check.
Step 6: Reset Windows Update Components Manually
If you don’t fix it by troubleshooting. Just go with manually reset Windows Update.
So, first of all, go to the start tab >> Open CMD [administrator]>> type commands on the command prompt.
- net stop bits
- net stop wuauserv
- net stop appidsvc
- net stop cryptsvc
- ren C:\Windows\SoftwareDistribution SoftwareDistribution.old
- ren C:\Windows\System32\catroot2 catroot2.old
- net start bits
- net start wuauserv
- net start appidsvc
- net start cryptsvc
Note: (Avoid using “-” with the above commands)
Step 7: Run SFC and DISM to Clean the Windows Update Cache
Other causes of update issues are corrupted system files. These tools should run to repair your system:
- Open Command Prompt as an administrator.
- Run the following commands:
sfc /scannow
DISM /Online /Cleanup-Image /restorehealth
Extra Tips for Fixing Problems with Windows Updates
Other procedures include the following steps if the cache clearance step did not fix the problem.
- Run the Windows Update Troubleshooter
- Press Windows+I to open Settings.
- Navigate to the Update & Security section to access Troubleshoot under Additional Troubleshooters.
- Open the Windows Update option from the list and proceed with running the troubleshooter.
When to Use a Repair Tool
If none of the above methods work, the problem may be because of system corruption deeper down. If you need to repair such problems, you can make use of a repair tool like Fortect. Fortect will give your system a scan for corrupt and missing files and fill them in, providing the maximum performance.
Conclusion
In conclusion, Clean Windows Update Cache, one simple yet effective solution for many of the update-related issues is clearing the Windows Update cache. If followed, the steps outlined in this guide will help to keep your system up to date and running fine. In case of persistent problems, you may apply other troubleshooting tools or ask for professional help.