
Pixel 10 Pro Fold Leaks: Familiar Look, but Big Changes Inside
Let’s discuss the Pixel 10 Pro Fold Leaks: Familiar Look, but Big Changes Inside. Hey tech fans! If you were […]
Let’s discuss the Pixel 10 Pro Fold Leaks: Familiar Look, but Big Changes Inside. Hey tech fans! If you were […]
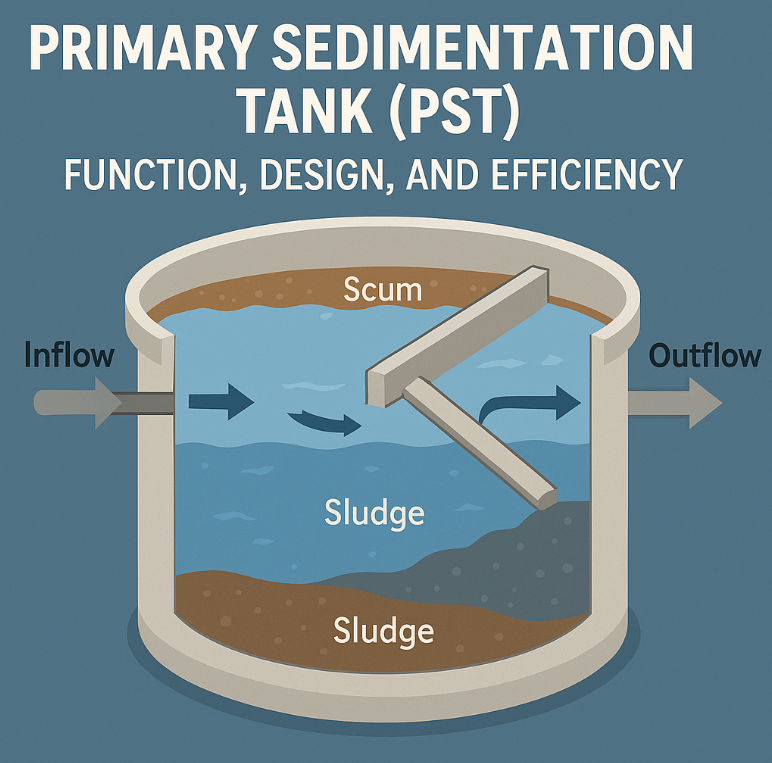
A Primary Sedimentation Tank (PST), also known as a Primary Clarifier, is an essential component in wastewater treatment plants. Its

Examine the PA Access Card health insurance benefits, including medical care services, dental coverage and vision benefits, prescription drug benefits,

Here is a detailed study to know about the Prevalence and Impact of Blood Parasites in Goats. Several reports do

Let’s learn about the Biochemical and Hematological Analysis of Goats Infected Theileria. This article will give us a in-depth knowledge

Looking to increase your credit limit with KeyBank or get a Credit Line Increase Through KeyBank? This guide covers eligibility,

Several people ask about the best mirrorless cameras for beginners in 2025. The photography market is experiencing rapid changes making

Let’s discuss the 8 important steps to clean the Windows update cache. The Windows Update system maintains your computer’s security
![Microsoft 365’s ‘Something Went Wrong’ [1001] Error](https://infinog.com/wp-content/uploads/2025/03/Screenshot-2025-03-15-023255-1024x553.png)
Let’s learn how to Fix the - Something Went Wrong [1001] error in Microsoft 365. Microsoft 365 displays the error

Let’s discuss the different Purposes of Wastewater Treatment Plants. More than 50 diseases spread through human excreta. Wastewater contains pathogens,
![How to Restore Missing WordPad in Windows? [Fix it]](https://infinog.com/wp-content/uploads/2025/03/Screenshot-2025-03-09-165505.png)
Several users inquire about how to restore missing WordPad in Windows. If WordPad is missing from your Windows computer, it’s

Several people ask How Many Blood Vials to Max Kain’s Health? In the world of gaming, particularly in action role-playing

Let’s learn how to delete your cash app account in detail. Cash App serves as one of the most commonly